巡风源码浅析
前言
由于一些需要,和抱着学习的目的,研读了下巡风这款相当优秀的扫描器代码。
https://github.com/ysrc/xunfeng
主要分析了下两个扫描的模块,对web端没有跟进看,当然重点也在扫描的部分。
分析的语句都以注释的形式标注在代码中了,由于能力有限,分析中的不足和错误欢迎指出。
整体架构逻辑
文件结构
│  Config.py  # 配置文件
│  README.md  # 说明文档
│  Run.bat  # Windows启动服务
│  Run.py  # webserver
│  Run.sh    # Linux启动服务,重新启动前需把进程先结束掉
│
├─aider
│      Aider.py  # 辅助验证脚本
│
├─db  # 初始数据库结构
│
├─masscan  # 内置编译好的Masscan程序(CentOS win64适用),需要chmod+x给执行权限(root),若无法使用请自行编译安装。
├─nascan
│  │  NAScan.py # 网络资产信息抓取引擎
│  │
│  ├─lib
│  │      common.py 其他方法
│  │      icmp.py  # ICMP发送类
│  │      log.py  # 日志输出
│  │      mongo.py  # 数据库连接
│  │      scan.py  # 扫描与识别
│  │      start.py  # 线程控制
│  │
│  └─plugin
│          masscan.py  # 调用Masscan脚本
│
├─views
│  │  View.py  # web请求处理
│  │
│  ├─lib
│  │      Conn.py  # 数据库公共类
│  │      CreateExcel.py  # 表格处理
│  │      Login.py  # 权限验证
│  │      QueryLogic.py  # 查询语句解析
│  │
│  ├─static #静态资源目录
│  │
│  └─templates #模板文件目录
│
└─vulscan
    │  VulScan.py  # 漏洞检测引擎
    │
    └─vuldb # 漏洞库目录
Run.sh
整个程序的开始就是从Run.sh开始的,可以先来看下起了哪些服务
#!/bin/bash
CURRENT_PATH=`dirname $0`
cd $CURRENT_PATH

XUNFENG_LOG=/var/log/xunfeng
XUNFENG_DB=/var/lib/mongodb

[ ! -d $XUNFENG_LOG ] && mkdir -p ${XUNFENG_LOG}
[ ! -d $XUNFENG_DB ] && mkdir -p ${XUNFENG_DB}

nohup mongod --port 65521 --dbpath=${XUNFENG_DB} --auth  > ${XUNFENG_LOG}/db.log &
nohup python ./Run.py > ${XUNFENG_LOG}/web.log &
nohup python ./aider/Aider.py > ${XUNFENG_LOG}/aider.log &
nohup python ./nascan/NAScan.py > ${XUNFENG_LOG}/scan.log &
nohup python ./vulscan/VulScan.py > ${XUNFENG_LOG}/vul.log &
可以看到主要起了如下四个服务
Run.py
from views.View import app

if __name__ == '__main__':
    #app.debug = True
    app.run(threaded=True, port=80,host='0.0.0.0')
webserver可以看出这个是flask起的web端,里面主要是做一些数据的展示和修改的。由于不是扫描器的重点,这里就不具体分析了,可以自己看下代码。
Aider.py
辅助验证脚本,一个50行左右的单文件,使用socket完成了一个简单的DNS log平台。
NAScan.py
网络资产信息抓取引擎 主要是调用nascan这个模块来进行网络资产(存活主机、开发端口、服务)的扫描。
VulScan.py
漏洞检测引擎 主要是调用vulscan/vuldb中的poc进行漏洞检测。
nascan
模块结构
─nascan
  │  NAScan.py # 网络资产信息抓取引擎
  │
  ├─lib
  │      common.py 其他方法
  │      icmp.py  # ICMP发送类
  │      log.py  # 日志输出
  │      mongo.py  # 数据库连接
  │      scan.py  # 扫描与识别
  │      start.py  # 线程控制
  └─plugin
masscan.py # 调用Masscan脚本从NAScan.py文件入口
# coding:utf-8
# author:wolf@YSRC
import thread
from lib.common import *
from lib.start import *
if __name__ == "__main__":
    try:
        CONFIG_INI = get_config()  # 读取配置
        log.write('info', None, 0, u'获取配置成功') # 日志记录
        STATISTICS = get_statistics()  # 读取统计信息
        MASSCAN_AC = [0] # 标识符 masscan是否在使用
        NACHANGE = [0] # 标识符 扫描列表是否被改变
        thread.start_new_thread(monitor, (CONFIG_INI,STATISTICS,NACHANGE))  # 心跳线程
        thread.start_new_thread(cruise, (STATISTICS,MASSCAN_AC))  # 失效记录删除线程
        socket.setdefaulttimeout(int(CONFIG_INI['Timeout']) / 2)  # 设置连接超时
        ac_data = []
        while True:
            now_time = time.localtime()
            now_hour = now_time.tm_hour
            now_day = now_time.tm_mday
            now_date = str(now_time.tm_year) + str(now_time.tm_mon) + str(now_day)
            cy_day, ac_hour = CONFIG_INI['Cycle'].split('|')
            log.write('info', None, 0, u'扫描规则: ' + str(CONFIG_INI['Cycle']))
            if (now_hour == int(ac_hour) and now_day % int(cy_day) == 0 and now_date not in ac_data) or NACHANGE[0]:  # 判断是否进入扫描时段
                ac_data.append(now_date)
                NACHANGE[0] = 0
                log.write('info', None, 0, u'开始扫描')
                s = start(CONFIG_INI)
                s.masscan_ac = MASSCAN_AC
                s.statistics = STATISTICS
                s.run() # 开始扫描
            time.sleep(60)
    except Exception, e:
        print e
准备工作
一开始是获取配置信息
def get_config():
    config = {}
    # 从mongodb中读取`nascan`的配置,可以从navicat中看到Config集合中有`vulscan`和`nascan`的扫描配置
    config_info = mongo.na_db.Config.find_one({"type": "nascan"})
    for name in config_info['config']:
        # 对于cms识别、组件容器、动态语言、服务 的配置存储是使用`|`进行分割存储的
        # 所以在取出之前要进行简单的格式化然后放到配置中
        if name in ['Discern_cms', 'Discern_con', 'Discern_lang', 'Discern_server']:
            config[name] = format_config(name, config_info['config'][name]['value'])
        else:
            config[name] = config_info['config'][name]['value']
    return config
然后是进行日志记录
# coding:utf-8
import threading
import time
import sys
reload(sys)
sys.setdefaultencoding('utf8')
mutex = threading.Lock() # 线程互斥锁
def write(scan_type, host, port, info):
    mutex.acquire() # 上锁,避免多个进程输出,导致格式混乱
    port = int(port)
    try:  # 由于Run.sh中使用了nohup,所以`print`的输出会被输出到log文件中
        time_str = time.strftime('%X', time.localtime(time.time()))
        if scan_type == 'portscan':
            print "[%s] %s:%d open" % (time_str, host, port)
        elif scan_type == 'server':
            print "[%s] %s:%d is %s" % (time_str, host, port, str(info))
        elif scan_type == 'web':
            print "[%s] %s:%d is web" % (time_str, host, port)
            print "[%s] %s:%d web info %s" % (time_str, host, port, info)
        elif scan_type == 'active':
            print "[%s] %s active" % (time_str, host)
        elif scan_type == 'info':
            print "[%s] %s" % (time_str, info)
    except Exception, e:
        print 'logerror',e
        pass
    mutex.release()
之后进行读取统计信息
def get_statistics():
    date_ = datetime.datetime.now().strftime('%Y-%m-%d')
    # 获取当日的统计信息
    now_stati = mongo.na_db.Statistics.find_one({"date": date_})
    if not now_stati:
        # 没有当日的信息则返回一个初始统计信息
        now_stati = {date_: {"add": 0, "update": 0, "delete": 0}}
        return now_stati
    else:
        # 有则返回
        return {date_: now_stati['info']}
两个监测线程
之后启动了两个现场,分别对应不同的功能
thread.start_new_thread(monitor, (CONFIG_INI,STATISTICS,NACHANGE))  # 心跳线程
thread.start_new_thread(cruise, (STATISTICS,MASSCAN_AC))  # 失效记录删除线程
monitor
monitor心跳线程,主要用于判断扫描配置是否发生了变化
def monitor(CONFIG_INI, STATISTICS, NACHANGE):
    while True:
        try:
            time_ = datetime.datetime.now()
            date_ = time_.strftime('%Y-%m-%d')
            # 记录心跳
            mongo.na_db.Heartbeat.update({"name": "heartbeat"}, {"$set": {"up_time": time_}})
            if date_ not in STATISTICS: STATISTICS[date_] = {"add": 0, "update": 0, "delete": 0}
            # 更新统计信息
            mongo.na_db.Statistics.update({"date": date_}, {"$set": {"info": STATISTICS[date_]}}, upsert=True)
            new_config = get_config() # 获取最新配置
            # 比较配置扫描列表的base64是否相同,不同则置NACHANGE[0]为1
            if base64.b64encode(CONFIG_INI["Scan_list"]) != base64.b64encode(new_config["Scan_list"]):NACHANGE[0] = 1
            CONFIG_INI.clear()
            CONFIG_INI.update(new_config) # 更新新配置
        except Exception, e:
            print e
        time.sleep(30) # 每30秒检测一次
回到NAScan.py中可以看到
# 判断是否达到了一个扫描的周期,或者心跳线程是否检测到扫描列表更新
# 因为上面可以看到base64不同时会将NACHANGE[0]置于1
# 至于为什么要传入NACHANGE[0]这样一个列表,而不是一个flag的int值(因为列表是引用啊!
if (now_hour == int(ac_hour) and now_day % int(cy_day) == 0 and now_date not in ac_data) or NACHANGE[0]:
cruise
然后是cruise 失效记录删除线程
def cruise(STATISTICS,MASSCAN_AC):
    while True:
        now_str = datetime.datetime.now()
        week = int(now_str.weekday())
        hour = int(now_str.hour)
        if week >= 1 and week <= 5 and hour >= 9 and hour <= 18:  # 非工作时间不删除
            try:
                # 获取扫描信息记录
                data = mongo.NA_INFO.find().sort("time", 1)
                for history_info in data:
                    while True:
                        # 如果masscan正在扫描即不进行清理
                        # 在后期可以看到在用masscan进行扫描的时候会置1
                        if MASSCAN_AC[0]:
                            time.sleep(10)
                        else:
                            break
                    ip = history_info['ip']
                    port = history_info['port']
                    try:
                        # 检测端口是否存活
                        sock = socket.socket(socket.AF_INET, socket.SOCK_STREAM)
                        sock.connect((ip, int(port)))
                        sock.close()
                    except Exception, e:
                        time_ = datetime.datetime.now()
                        date_ = time_.strftime('%Y-%m-%d')
                        # 不存活则删除改记录
                        mongo.NA_INFO.remove({"ip": ip, "port": port})
                        log.write('info', None, 0, '%s:%s delete' % (ip, port)) # 日志记录
                        STATISTICS[date_]['delete'] += 1
                        del history_info["_id"]
                        history_info['del_time'] = time_
                        history_info['type'] = 'delete'
                        # 添加一条操作历史
                        mongo.NA_HISTORY.insert(history_info)
            except:
                pass
        time.sleep(3600) # 60分钟检测一次
start.py
回到NAScan.py, 前期的一些工作已经做完了,后面就可以进入while True的扫描循环了
now_time = time.localtime()
now_hour = now_time.tm_hour
now_day = now_time.tm_mday
now_date = str(now_time.tm_year) + str(now_time.tm_mon) + str(now_day)
# 获取资产探测周期
cy_day, ac_hour = CONFIG_INI['Cycle'].split('|')
log.write('info', None, 0, u'扫描规则: ' + str(CONFIG_INI['Cycle']))
if (now_hour == int(ac_hour) and now_day % int(cy_day) == 0 and now_date not in ac_data) or NACHANGE[0]:  # 判断是否进入扫描时段
    ac_data.append(now_date) # 判断是否扫描过的列表
    NACHANGE[0] = 0 # 置0,
    log.write('info', None, 0, u'开始扫描')
    s = start(CONFIG_INI)
    s.masscan_ac = MASSCAN_AC
    s.statistics = STATISTICS
    s.run() # 开始扫描
    time.sleep(60)
s = start(CONFIG_INI)初始化了一个start类
class start:
    def __init__(self, config):
        # 传入CONFIG_INI 配置,然后设置类的属性
        self.config_ini = config
        self.queue = Queue.Queue()
        self.thread = int(self.config_ini['Thread'])
        self.scan_list = self.config_ini['Scan_list'].split('\n')
        self.mode = int(self.config_ini['Masscan'].split('|')[0])
        self.icmp = int(self.config_ini['Port_list'].split('|')[0])
        self.white_list = self.config_ini.get('White_list', '').split('\n')
然后回来额外设置了masscan_ac和statistics两个引用标识符(因为要与其他线程共享对它的修改,相当于全局变量
然后启动s.run()开始扫描
def run(self):
    # 在start.py中定义的全局变量,端口列表
    global AC_PORT_LIST
    all_ip_list = []
    for ip in self.scan_list:
        # 处理CIDR格式的ip, eg:192.168.0.1/24
        # 就不具体跟进看了,大约40行左右,涉及一些位运算格式转换啥的
        if "/" in ip: ip = cidr.CIDR(ip)
        if not ip:continue
        # 处理 192.168.0.1-192.168.0.255 这类范围ip
        ip_list = self.get_ip_list(ip)
        # 对于白名单ip进行移除
        for white_ip in self.white_list:
            if white_ip in ip_list:
                ip_list.remove(white_ip)
       # 是否开始了masscan扫描,开启了mode置为1,否则为0
       if self.mode == 1: # 使用masscan扫描
            # 获取文件路径
            self.masscan_path = self.config_ini['Masscan'].split('|')[2]
            # 获取扫描速率
            self.masscan_rate = self.config_ini['Masscan'].split('|')[1]
            # 获取存活的ip
            ip_list = self.get_ac_ip(ip_list)
            self.masscan_ac[0] = 1
            AC_PORT_LIST = self.masscan(ip_list)  # 如果安装了Masscan即使用Masscan进行全端口扫描
            if not AC_PORT_LIST: continue
            self.masscan_ac[0] = 0
            for ip_str in AC_PORT_LIST.keys(): self.queue.put(ip_str)  # 加入队列
            self.scan_start()  # 开始扫描
        else:
            all_ip_list.extend(ip_list)
    if self.mode == 0: # 不使用masscan扫描
        if self.icmp: all_ip_list = self.get_ac_ip(all_ip_list)
        for ip_str in all_ip_list: self.queue.put(ip_str)  # 加入队列
        self.scan_start()  # TCP探测模式开始扫描
探测存活ip
self.get_ac_ip()是通过ping请求来探测主机存活,后期只对存活主机进行扫描
def get_ac_ip(self, ip_list):
    try:
        s = icmp.Nscan()
        ipPool = set(ip_list)
        return s.mPing(ipPool)
    except Exception, e:
        print 'The current user permissions unable to send icmp packets'
        return ip_list
跟到s.mPing()中
def mPing(self, ipPool):
    # 获得icmp的socket
    Sock = self.__icmpSocket
    Sock.settimeout(self.timeout)
    # 设置icmp数据报
    packet = self.__icmpPacket
    recvFroms = set()
    # 初始化一个多线程的icmp请求类
    sendThr = SendPingThr(ipPool, packet, Sock, self.timeout)
    # 启动多线程icmp扫描
    sendThr.start()
    while True:
        try:
            # 获取返回的ip地址
            ac_ip = Sock.recvfrom(1024)[1][0]
            if ac_ip not in recvFroms:
                log.write("active", ac_ip, 0, None)
                # 添加存活ip到`recvForms`
                recvFroms.add(ac_ip)
        except Exception:
            pass
        finally:
            if not sendThr.isAlive():
                break
    # 返回两个集合的交集
    return recvFroms & ipPool
SendPingThr类
class SendPingThr(threading.Thread):
    def __init__(self, ipPool, icmpPacket, icmpSocket, timeout=3):
        threading.Thread.__init__(self)
        self.Sock = icmpSocket
        self.ipPool = ipPool
        self.packet = icmpPacket
        self.timeout = timeout
        self.Sock.settimeout(timeout + 1)

    def run(self):
        for ip in self.ipPool:
            try:
                self.Sock.sendto(self.packet, (ip, 0))
            except socket.timeout:
                break
            except:
                pass
        time.sleep(self.timeout)
masscan扫描全端口
这样就依次将存活的ip返回到了start.py中的run()中
# 获取到返回的存活ip
ip_list = self.get_ac_ip(ip_list)
# 将masscan_ac[0]置1,表示masscan正在使用
self.masscan_ac[0] = 1
# 利用masscan进行全端口扫描
AC_PORT_LIST = self.masscan(ip_list)
if not AC_PORT_LIST: continue
# 将masscan_ac[0]置0
self.masscan_ac[0] = 0
for ip_str in AC_PORT_LIST.keys(): self.queue.put(ip_str)  # 加入队列
self.scan_start()  # 开始扫描
跟进self.masscan()函数
def masscan(self, ip):
    try:
        if len(ip) == 0: return
        sys.path.append(sys.path[0] + "/plugin")
        m_scan = __import__("masscan")
        result = m_scan.run(ip, self.masscan_path, self.masscan_rate)
        return result
    except Exception, e:
        print e
        print 'No masscan plugin detected'
跟进m_scan.run()
import os
def run(ip_list,path,rate):
    try:
        ip_file = open('target.log','w')
        # 将存活的ip列表写到target.log中
        ip_file.write("\n".join(ip_list))
        ip_file.close()
        # 进行过滤一些危险字符
        #(issue中也有提到,并不能完全保证后台的安全,主要还是保证对密钥的管理
        path = str(path).translate(None, ';|&`\n')
        rate = str(rate).translate(None, ';|&`\n')
        if not os.path.exists(path):return
        # 用系统命令进行masscan全端口扫描
        os.system("%s -p1-65535 -iL target.log -oL tmp.log --randomize-hosts --rate=%s"%(path,rate))
        # 读取扫描结果
        result_file = open('tmp.log', 'r')
        result_json = result_file.readlines()
        result_file.close()
        del result_json[0]
        del result_json[-1]
        open_list = {}
        # 对扫描结果进行格式化处理
        for res in result_json:
            try:
                ip = res.split()[3]
                port = res.split()[2]
                if ip in open_list:
                    open_list[ip].append(port)
                else:
                    open_list[ip] = [port]
            except:pass
        os.remove('target.log')
        os.remove('tmp.log')
        # 返回扫描结果
        return open_list
    except:
        pass
这样,再次回到start.py的run()中
# 用masscan进行全端口扫描
AC_PORT_LIST = self.masscan(ip_list)
if not AC_PORT_LIST: continue
# 将self.masscan_ac[0]置0,表示结束使用
self.masscan_ac[0] = 0
# 将扫描结果存入队列中
for ip_str in AC_PORT_LIST.keys(): self.queue.put(ip_str)
# 开始扫描
self.scan_start()
scan.py
前期准备
self.scan_start()
def scan_start(self):
    for i in range(self.thread):  # 开始扫描
        t = ThreadNum(self.queue)
        t.setDaemon(True)
        t.mode = self.mode
        t.config_ini = self.config_ini
        t.statistics = self.statistics
        t.start()
    self.queue.join()
跟进ThreadNum类
class ThreadNum(threading.Thread):
    def __init__(self, queue):
        # 赋值扫描队列
        threading.Thread.__init__(self)
        self.queue = queue

    def run(self):
        while True:
            try:
                # 非阻塞模式
                task_host = self.queue.get(block=False)
            except:
                break
            try:
                if self.mode:
                    # 开启masscan扫描则使用扫描出的存活端口
                    port_list = AC_PORT_LIST[task_host]
                else:
                    # 否则扫描特定的端口
                    port_list = self.config_ini['Port_list'].split('|')[1].split('\n')
                _s = scan.scan(task_host, port_list) # 初始化scan
                _s.config_ini = self.config_ini  # 提供配置信息
                _s.statistics = self.statistics  # 提供统计信息
                _s.run() # 启动
            except Exception, e:
                print e
            finally:
                self.queue.task_done()
跟到scan类的run()方法中
def run(self):
    self.timeout = int(self.config_ini['Timeout']) # 获取timeout
    for _port in self.port_list:
        self.server = ''
        self.banner = ''
        self.port = int(_port)
        self.scan_port()  # 端口扫描
        if not self.banner:continue #无banner则跳过(`NULL`表示暂未检测出,不会continue
        self.server_discern()  # 服务识别
        if self.server == '':
            web_info = self.try_web()  # 尝试web访问
            if web_info:
                # log记录
                log.write('web', self.ip, self.port, web_info)
                time_ = datetime.datetime.now()
                # 将扫描结果存入mongodb
                mongo.NA_INFO.update({'ip': self.ip, 'port': self.port},
                                     {"$set": {'banner': self.banner, 'server': 'web', 'webinfo': web_info,
                                               'time': time_}})
端口扫描
先是进行了self.scan_port()端口扫描
def scan_port(self):
    try:
        # 进行socket连接
        sock = socket.socket(socket.AF_INET, socket.SOCK_STREAM)
        sock.setsockopt(socket.SOL_SOCKET, socket.SO_REUSEADDR, 1)
        sock.connect((self.ip, self.port))
        time.sleep(0.2)
    except Exception, e:
        return
    try:
        # 获取banner信息
        self.banner = sock.recv(1024)
        sock.close()
        # 小于等于2则置为'NULL'
        if len(self.banner) <= 2:
            self.banner = 'NULL'
    except Exception, e:
        # 异常情况也置为'NULL'
        self.banner = 'NULL'
    # 日志记录
    log.write('portscan', self.ip, self.port, None)
    banner = ''
    hostname = self.ip2hostname(self.ip)
    time_ = datetime.datetime.now()
    date_ = time_.strftime('%Y-%m-%d')
    try:
        # 进行unicode转换
        banner = unicode(self.banner, errors='replace')
        if self.banner == 'NULL': banner = ''
        # 添加一条info信息
        mongo.NA_INFO.insert({"ip": self.ip, "port": self.port, "hostname": hostname, "banner": banner, "time": time_})
        # 统计信息+1
        self.statistics[date_]['add'] += 1
    except:
        if banner:
            # 原子操作,删除已存在的记录
            history_info = mongo.NA_INFO.find_and_modify(
                query={"ip": self.ip, "port": self.port, "banner": {"$ne": banner}}, remove=True)
            if history_info:
                # 新增info记录
                mongo.NA_INFO.insert(
                    {"ip": self.ip, "port": self.port, "hostname": hostname, "banner": banner, "time": time_})
                # 统计信息+1
                self.statistics[date_]['update'] += 1
                # 删除原先的_id
                del history_info["_id"]
                history_info['del_time'] = time_
                history_info['type'] = 'update'
                # 更新type和del_time之后插入一条新历史记录
                mongo.NA_HISTORY.insert(history_info)
进行socket连接的时候,例如一些ssh之类的服务,会返回一些banner信息
服务识别
def server_discern(self):
    # 先尝试进行利用配置中的`Discern_server`进行快速匹配识别
    for mark_info in self.config_ini['Discern_server']:
        try:
            name, default_port, mode, reg = mark_info
            if mode == 'default':
                # default表示用特定端口,匹配特定服务
                if int(default_port) == self.port:
                    self.server = name
            elif mode == 'banner':
                # 利用banner信息进行正则匹配检测
                matchObj = re.search(reg, self.banner, re.I | re.M)
                if matchObj:
                    self.server = name
            if self.server:break
        except:
            continue
    # 对于未检测出服务并且端口不为80、443、8080的端口进行检测
    if not self.server and self.port not in [80,443,8080]:
        for mark_info in self.config_ini['Discern_server']:  # 发包识别
            try:
                name, default_port, mode, reg = mark_info
                if mode not in ['default','banner']:
                    # 进行发送特定的socket包获取banner信息,进行再次匹配
                    dis_sock = socket.socket(socket.AF_INET, socket.SOCK_STREAM)
                    dis_sock.connect((self.ip, self.port))
                    mode = mode.decode('string_escape')
                    reg = reg.decode('string_escape')
                    dis_sock.send(mode)
                    time.sleep(0.3)
                    dis_recv = dis_sock.recv(1024)
                    dis_sock.close()
                    matchObj = re.search(reg, dis_recv, re.I | re.M)
                    if matchObj:
                        self.server = name
                        break
            except:
                pass
    if self.server:
        # 对于检测到的服务,进行log和info的记录
        log.write("server", self.ip, self.port, self.server)
        mongo.NA_INFO.update({"ip": self.ip, "port": self.port}, {"$set": {"server": self.server}})
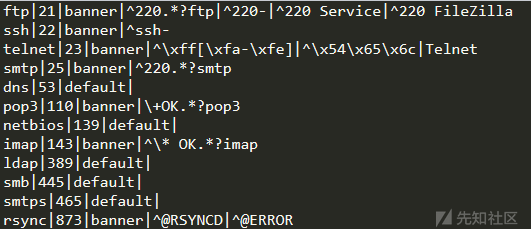
config_ini['Discern_server']中的值
config_ini['Discern_server']中的特定socket数据包
web访问
def try_web(self):
    title_str, html = '', ''
    try:# 进行http/https请求,获取响应报文
        if self.port == 443:
            # 对于443端口的使用https协议
            info = urllib2.urlopen("https://%s:%s" % (self.ip, self.port), timeout=self.timeout)
        else:
            info = urllib2.urlopen("http://%s:%s" % (self.ip, self.port), timeout=self.timeout)
        html = info.read()
        header = info.headers
    except urllib2.HTTPError, e:
        html = e.read()
        header = e.headers
    except:
        return
    if not header: return
    # 对于gzip格式的响应,进行解压gzip
    if 'Content-Encoding' in header and 'gzip' in header['Content-Encoding']:
        html_data = StringIO.StringIO(html)
        gz = gzip.GzipFile(fileobj=html_data)
        html = gz.read()
    try:
        # 格式转码
        html_code = self.get_code(header, html).strip()
        if html_code and len(html_code) < 12:
            html = html.decode(html_code).encode('utf-8')
    except: pass
    try:
        # 获取titile信息
        title = re.search(r'<title>(.*?)</title>', html, flags=re.I | re.M)
        if title: title_str = title.group(1)
    except: pass
    try:
        # 将响应的http报文设置成banner信息
        web_banner = str(header) + "\r\n\r\n" + html
        self.banner = web_banner
        # 添加记录
        history_info = mongo.NA_INFO.find_one({"ip": self.ip, "port": self.port})
        if 'server' not in history_info:
            tag = self.get_tag()
            web_info = {'title': title_str, 'tag': tag}
            return web_info
        else:
            if abs(len(history_info['banner'].encode('utf-8')) - len(web_banner)) > len(web_banner) / 60:
                del history_info['_id']
                history_info['del_time'] = datetime.datetime.now()
                mongo.NA_HISTORY.insert(history_info)
                tag = self.get_tag()
                web_info = {'title': title_str, 'tag': tag}
                date_ = datetime.datetime.now().strftime('%Y-%m-%d')
                self.statistics[date_]['update'] += 1
                log.write('info', None, 0, '%s:%s update web info'%(self.ip, self.port))
                return web_info
    except:
        return
get_tag()
def get_tag(self):
    try:
        url = self.ip + ':' + str(self.port)
        # 对web服务进行cms、组件容器、动态语言的识别
        tag = map(self.discern, ['Discern_cms', 'Discern_con', 'Discern_lang'], [url, url, url])
        # 过滤掉未识别出的服务
        return filter(None, tag)
    except Exception, e:
        return
discern()
def discern(self, dis_type, domain):
    file_tmp = {}
    if int(domain.split(":")[1]) == 443: # http/https处理
        protocol = "https://"
    else:
        protocol = "http://"
    try:
        # http请求
        req = urllib2.urlopen(protocol + domain, timeout=self.timeout)
        header = req.headers
        html = req.read()
    except urllib2.HTTPError, e:
        html = e.read()
        header = e.headers
    except Exception, e:
        return

    # 对于'Discern_cms', 'Discern_con', 'Discern_lang'在数据库中都有自己的识别判断方式
    for mark_info in self.config_ini[dis_type]:
        if mark_info[1] == 'header':
            try:
                if not header: return
                # 通过header方式则对对应的http头中的值进行匹配
                # 如存在PHPSSIONID之类的值判定为php
                if re.search(mark_info[3], header[mark_info[2]], re.I):
                    return mark_info[0]
            except Exception, e:
                continue
        elif mark_info[1] == 'file':
            if mark_info[2] == 'index':
                try:
                    if not html: return
                    # 对于file index方式利用文件后缀,如1.php这样判断为php语言
                    if re.search(mark_info[3], html, re.I):
                        return mark_info[0]
                except Exception, e:
                    continue
            else:
                # 防止重复检测
                if mark_info[2] in file_tmp:
                    re_html = file_tmp[mark_info[2]]
                else:
                    # 访问指定的robots.txt之类的文件
                    try:
                        re_html = urllib2.urlopen(protocol + domain + "/" + mark_info[2],
                                                  timeout=self.timeout).read()
                    except urllib2.HTTPError, e:
                        re_html = e.read()
                    except Exception, e:
                        return
                    file_tmp[mark_info[2]] = re_html
                try:
                    # 检测指定文件中是否存在特定关键字
                    # 如robots.txt中存在'php168'则为php168cms
                    if re.search(mark_info[3], re_html, re.I):
                        return mark_info[0]
                except Exception, e:
                    print mark_info[3]
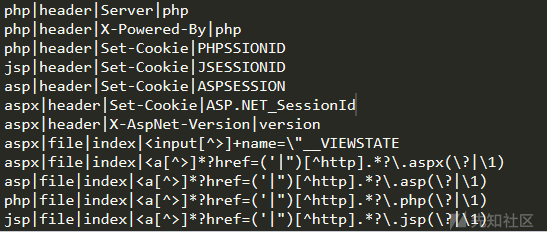
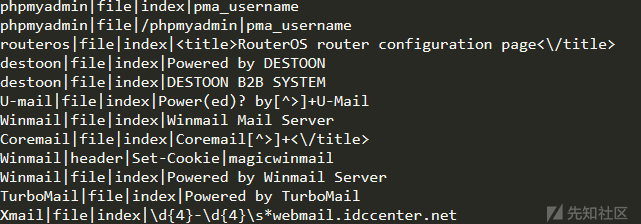
config_ini[Discern_lang]中的值
config_ini[Discern_cms]中的值
最后回到run()中
web_info = self.try_web()  # 尝试web访问
if web_info:
    # 检测完web特征之后,就是进行简单的log记录,和更新数据库中info的值
    log.write('web', self.ip, self.port, web_info)
    time_ = datetime.datetime.now()
    mongo.NA_INFO.update({'ip': self.ip, 'port': self.port},
                         {"$set": {'banner': self.banner, 'server': 'web', 'webinfo': web_info,
                                   'time': time_}})
到这里,scan的扫描也就结束了,回到start类的run()中,剩下的就是不使用masscan的扫描
if self.mode == 0: # 不使用masscan扫描
    # 如果设置了icmp检测,会对ip列表进行存活检测,只扫描存活ip
    if self.icmp: all_ip_list = self.get_ac_ip(all_ip_list)
    for ip_str in all_ip_list: self.queue.put(ip_str)  # 加入队列
    self.scan_start()  # TCP探测模式开始扫描
这里的扫描过程中将ip列表改成了all_ip_list,其余的扫描过程也是通过scan_start()来调用scan类进行扫描。
到这里,整个NAScan资产扫描过程也就完成了,每次扫描完会sleep60秒,然后再次循环这个过程。
vulscan
用于对扫出的资产进行漏洞扫描,具体的扫描过程依赖于vuldb中的插件形式进行扫描,做到可插拔的模式
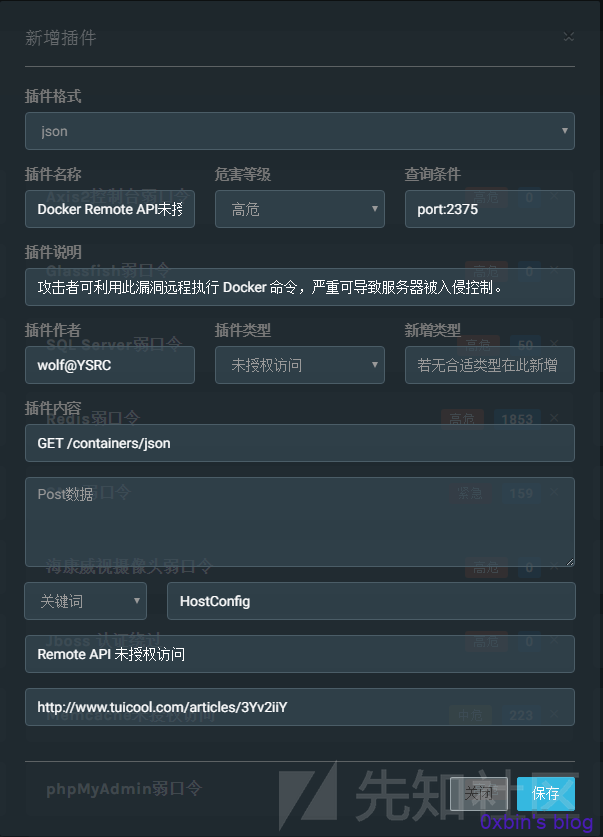
json格式的插件
转换成json形式后就是
{
    "name" : "Axis2信息泄露",
    "info" : "HappyAxis.jsp 页面存在系统敏感信息。",
    "level" : "低危",
    "type" : "信息泄露",
    "author" : "wolf@YSRC",
    "url": "",
    "keyword" : "tag:axis2",
    "source" : 1,
    "plugin" : {
        "url" : "/axis2/axis2-web/HappyAxis.jsp",
        "tag" : "敏感信息泄露",
        "analyzing" : "keyword",
        "analyzingdata" : "Axis2 Happiness Page",
        "data" : "",
        "method" : "GET"
    }
}
python脚本格式的插件
# coding:utf-8

import ftplib

def get_plugin_info():  # 插件描述信息
    plugin_info = {
        "name": "FTP弱口令",
        "info": "导致敏感信息泄露,严重情况可导致服务器被入侵控制。",
        "level": "高危",
        "type": "弱口令",
        "author": "wolf@YSRC",
        "url": "",
        "keyword": "server:ftp",  # 推荐搜索关键字
    }
    return plugin_info

def check(ip, port, timeout): # 漏洞检测代码
    user_list = ['ftp', 'www', 'admin', 'root', 'db', 'wwwroot', 'data', 'web']
    for user in user_list:
        for pass_ in PASSWORD_DIC:  # 密码字典无需定义,程序会自动为其赋值。
            pass_ = str(pass_.replace('{user}', user))
            try:
                ftp = ftplib.FTP()
                ftp.timeout = timeout
                ftp.connect(ip, port)
                ftp.login(user, pass_)
                if pass_ == '': pass_ = 'null'
                if user == 'ftp' and pass_ == 'ftp': return u"可匿名登录"
                return u"存在弱口令,账号:%s,密码:%s" % (user, pass_)  # 成功返回结果,内容显示在扫描结果页面。
            except:
                pass
扫描过程较资产扫描偏简单些,一个280行左右的单文件
一开始定义了一些全局变量
# 添加系统路径
sys.path.append(sys.path[0] + '/vuldb')
sys.path.append(sys.path[0] + "/../")
# 获取mongodb账号配置
from Config import ProductionConfig
# 进行mongodb认证连接
db_conn = pymongo.MongoClient(ProductionConfig.DB, ProductionConfig.PORT)
na_db = getattr(db_conn, ProductionConfig.DBNAME)
na_db.authenticate(ProductionConfig.DBUSERNAME, ProductionConfig.DBPASSWORD)
# 做了几个集合的简化操作
na_task = na_db.Task
na_result = na_db.Result
na_plugin = na_db.Plugin
na_config = na_db.Config
na_heart = na_db.Heartbeat
# 线程锁
lock = thread.allocate()
# 一些全局变量
PASSWORD_DIC = []
THREAD_COUNT = 50
TIMEOUT = 10
PLUGIN_DB = {}
TASK_DATE_DIC = {}
WHITE_LIST = []
然后开始运行流程
if __name__ == '__main__':
    init() # 进行init初始化操作
    PASSWORD_DIC, THREAD_COUNT, TIMEOUT, WHITE_LIST = get_config() # 获取配置
    thread.start_new_thread(monitor, ()) # 启动监控线程
    while True:
        task_id, task_plan, task_target, task_plugin = queue_get() # 任务信息获取
        if task_id == '':
            time.sleep(10)
            continue
        if PLUGIN_DB:
            del sys.modules[PLUGIN_DB.keys()[0]] # 清理插件缓存
            PLUGIN_DB.clear()
        for task_netloc in task_target:
            while True:
                if int(thread._count()) < THREAD_COUNT:
                    if task_netloc[0] in WHITE_LIST: break
                    thread.start_new_thread(vulscan, (task_id, task_netloc, task_plugin))
                    break
                else:
                    time.sleep(2)
        if task_plan == 0: na_task.update({"_id": task_id}, {"$set": {"status": 2}})
准备工作
init
用于获取插件的信息
def init():
    # 若数据库中存在插件信息,则直接返回,否则重新获取
    if na_plugin.find().count() >= 1: return
    script_plugin = []
    json_plugin = []
    # 获取vuldb中的插件
    file_list = os.listdir(sys.path[0] + '/vuldb')
    time_ = datetime.datetime.now()
    for filename in file_list:
        try:
            # 插件分为json和py两种格式
            if filename.split('.')[1] == 'py':
                script_plugin.append(filename.split('.')[0])
            if filename.split('.')[1] == 'json':
                json_plugin.append(filename)
        except:
            pass
    for plugin_name in script_plugin:
        try:
            # py格式的插件直接导入,然后读取对于变量,插入到mongodb中
            res_tmp = __import__(plugin_name)
            plugin_info = res_tmp.get_plugin_info()
            plugin_info['add_time'] = time_
            plugin_info['filename'] = plugin_name
            plugin_info['count'] = 0
            na_plugin.insert(plugin_info)
        except:
            pass
    for plugin_name in json_plugin:
        try:
            # json格式的插件,用json解析后读取对应变量,插入到mongodb中
            json_text = open(sys.path[0] + '/vuldb/' + plugin_name, 'r').read()
            plugin_info = json.loads(json_text)
            plugin_info['add_time'] = time_
            plugin_info['filename'] = plugin_name
            plugin_info['count'] = 0
            del plugin_info['plugin']
            na_plugin.insert(plugin_info)
        except:
            pass
get_config
def get_config():
    try:
        config_info = na_config.find_one({"type": "vulscan"})
        pass_row = config_info['config']['Password_dic']
        thread_row = config_info['config']['Thread']
        timeout_row = config_info['config']['Timeout']
        white_row = config_info['config']['White_list']
        password_dic = pass_row['value'].split('\n')
        thread_count = int(thread_row['value'])
        timeout = int(timeout_row['value'])
        white_list = white_row['value'].split('\n')
        return password_dic, thread_count, timeout, white_list
    except Exception, e:
        print e
和之前nascan中的读取配置类似,只是这回读的是type为vulscan的配置
读取弱口令、线程数、timeout、白名单之类的配置参数,然后返回
monitor
新起了个monitor监测线程,监测插件的使用情况
def monitor():
    # 引入全局变量
    global PASSWORD_DIC, THREAD_COUNT, TIMEOUT, WHITE_LIST
    while True:
        # 获取正在执行的任务
        queue_count = na_task.find({"status": 0, "plan": 0}).count()
        if queue_count:
            # 如果有正在执行的任务,则置为1
            load = 1
        else:
            # 否则根据当前线程数,来判断插件是否在被使用
            ac_count = thread._count()
            load = float(ac_count - 4) / THREAD_COUNT
        if load > 1: load = 1
        if load < 0: load = 0
        # 更新mongodb中的heatbeat集合,有插件正在扫描
        na_heart.update({"name": "load"}, {"$set": {"value": load, "up_time": datetime.datetime.now()}})
        PASSWORD_DIC, THREAD_COUNT, TIMEOUT, WHITE_LIST = get_config()
        # 然后根据load值进行不同时间的休眠
        if load > 0:
            time.sleep(8)
        else:
            time.sleep(60)
然后进入到while True的循环
通过queue_get()进行任务参数的获取
def queue_get():
    global TASK_DATE_DIC
    # 获取未加载的task,更新为启动状态
    task_req = na_task.find_and_modify(query={"status": 0, "plan": 0}, update={"$set": {"status": 1}}, sort={'time': 1})
    if task_req:
        # 如果存在,在TASK_DATE_DIC记录task,然后返回任务信息
        TASK_DATE_DIC[str(task_req['_id'])] = datetime.datetime.now()
        return task_req['_id'], task_req['plan'], task_req['target'], task_req['plugin']
    else:
        # 获取 plan != 0 的task列表
        task_req_row = na_task.find({"plan": {"$ne": 0}})
        if task_req_row:
            for task_req in task_req_row:
                # 判断是否需要再次启动任务
                if (datetime.datetime.now() - task_req['time']).days / int(task_req['plan']) >= int(task_req['status']):
                    if task_req['isupdate'] == 1:
                        # 任务更新后,需要重新从info集合中获取ip和port
                        # 更新task集合的target
                        task_req['target'] = update_target(json.loads(task_req['query']))
                        na_task.update({"_id": task_req['_id']}, {"$set": {"target": task_req['target']}})
                    # 更新task集合中的status自增1
                    na_task.update({"_id": task_req['_id']}, {"$inc": {"status": 1}})
                    # 在TASK_DATE_DIC记录task
                    TASK_DATE_DIC[str(task_req['_id'])] = datetime.datetime.now()
                    # 返回task信息
                    return task_req['_id'], task_req['plan'], task_req['target'], task_req['plugin']
        return '', '', '', ''
回到__main__中
# 获取任务信息
task_id, task_plan, task_target, task_plugin = queue_get()
if task_id == '':
    # 没有获取到task配置则sleep10秒后继续获取
    time.sleep(10)
    continue
if PLUGIN_DB:
    # 当有插件缓存时清理插件缓存
    # 后面扫描时会导入插件模块,删除之前导入的模块
    del sys.modules[PLUGIN_DB.keys()[0]]
    PLUGIN_DB.clear()
for task_netloc in task_target:
    while True:
        # 控制线程数
        if int(thread._count()) < THREAD_COUNT:
            # 剔除白名单ip
            if task_netloc[0] in WHITE_LIST: break
            # 启动vulscan扫描线程
            thread.start_new_thread(vulscan, (task_id, task_netloc, task_plugin))
            break
        else:
            time.sleep(2)
# task_plan == 0 为一次性任务
# 更新 status = 2
if task_plan == 0: na_task.update({"_id": task_id}, {"$set": {"status": 2}})
vulscan
__init__
def __init__(self, task_id, task_netloc, task_plugin):
    self.task_id = task_id
    self.task_netloc = task_netloc
    self.task_plugin = task_plugin
    self.result_info = ''
    self.start()
设置好类变量,然后进入start()
def start(self):
    self.get_plugin_info()
    if '.json' in self.plugin_info['filename']:  # json检测模式
        try:
            self.load_json_plugin()  # 读取漏洞标示
            self.set_request()  # 标示符转换为请求
            self.poc_check()  # 检测
        except Exception, e:
            return
    else:  # py脚本检测模式
        plugin_filename = self.plugin_info['filename']
        self.log(str(self.task_netloc) + "call " + self.task_plugin)
        if task_plugin not in PLUGIN_DB:
            plugin_res = __import__(plugin_filename)
            setattr(plugin_res, "PASSWORD_DIC", PASSWORD_DIC)  # 给插件声明密码字典
            PLUGIN_DB[plugin_filename] = plugin_res
        try:
            self.result_info = PLUGIN_DB[plugin_filename].check(str(self.task_netloc[0]), int(self.task_netloc[1]),TIMEOUT)
        except:
            return
    self.save_request()  # 保存结果
json格式检测
先load_json_plugin()加载配置脚本
def get_plugin_info(self):
    info = na_plugin.find_one({"name": self.task_plugin})
    self.plugin_info = info
然后转换为http请求,返回请求句柄
def set_request(self):
    # 构建url
    url = 'http://' + self.task_netloc[0] + ":" + str(self.task_netloc[1]) + self.plugin_info['plugin']['url']
    if self.plugin_info['plugin']['method'] == 'GET':
        # 进行GET请求
        request = urllib2.Request(url)
    else:
        # 否则进行post请求
        request = urllib2.Request(url, self.plugin_info['plugin']['data'])
    self.poc_request = request
然后验证poc是否有效
def poc_check(self):
    try:
        # 进行http请求,获取header和body信息
        res = urllib2.urlopen(self.poc_request, timeout=30)
        res_html = res.read(204800)
        header = res.headers
        # res_code = res.code
    except urllib2.HTTPError, e:
        # res_code = e.code
        header = e.headers
        res_html = e.read(204800)
    except Exception, e:
        return
    try:
        # 获取编码,然后转码
        html_code = self.get_code(header, res_html).strip()
        if html_code and len(html_code) < 12:
            res_html = res_html.decode(html_code).encode('utf-8')
    except:
        pass
    an_type = self.plugin_info['plugin']['analyzing']
    vul_tag = self.plugin_info['plugin']['tag']
    analyzingdata = self.plugin_info['plugin']['analyzingdata']
    if an_type == 'keyword':
        # 如果是关键词检测,判断是正则还是MD5的检测,然后进行比对
        if analyzingdata.encode("utf-8") in res_html: self.result_info = vul_tag
    elif an_type == 'regex':
        if re.search(analyzingdata, res_html, re.I): self.result_info = vul_tag
    elif an_type == 'md5':
        md5 = hashlib.md5()
        md5.update(res_html)
        # 比对成功,则返回插件tag
        if md5.hexdigest() == analyzingdata: self.result_info = vul_tag
py脚本检测
# 获取插件文件名
plugin_filename = self.plugin_info['filename']
self.log(str(self.task_netloc) + "call " + self.task_plugin)
if task_plugin not in PLUGIN_DB:
    # 不在PLUGIN_DB中则导入
    plugin_res = __import__(plugin_filename)
    setattr(plugin_res, "PASSWORD_DIC", PASSWORD_DIC)  # 给插件声明密码字典
    PLUGIN_DB[plugin_filename] = plugin_res # 添加到PLUGIN_DB中
try:
    # 启用py脚本的check方法,并设置timeout
    self.result_info = PLUGIN_DB[plugin_filename].check(str(self.task_netloc[0]), int(self.task_netloc[1]),TIMEOUT)
except:
    return
保存请求结果
def save_request(self):
    # 判断是否扫描出结果了
    if self.result_info:
        try:
            time_ = datetime.datetime.now()
            self.log(str(self.task_netloc) + " " + self.result_info)
            # 没有这条扫描记录则插件扫出的记录+1
            v_count = na_result.find(
                {"ip": self.task_netloc[0], "port": self.task_netloc[1], "info": self.result_info}).count()
            if not v_count: na_plugin.update({"name": self.task_plugin}, {"$inc": {'count': 1}})
            vulinfo = {"vul_name": self.plugin_info['name'], "vul_level": self.plugin_info['level'],
                       "vul_type": self.plugin_info['type']}
            w_vul = {"task_id": self.task_id, "ip": self.task_netloc[0], "port": self.task_netloc[1],
                     "vul_info": vulinfo, "info": self.result_info, "time": time_,
                     "task_date": TASK_DATE_DIC[str(self.task_id)]}
            # 添加扫描结果记录
            na_result.insert(w_vul)
        except Exception, e:
            pass
到此也就完成了vulscan的扫描过程。
最后
巡风中对于扫描的分工,多线程的处理都有很多值得学习和借鉴的地方。而且几乎都有增加一些心跳线程,用于监测。
分析中难免有些不足或者错误,欢迎大佬们指出!
Reference
https://landgrey.me/xunfeng-nascan-analysis/
原文链接:https://xz.aliyun.com/t/4104


